springboot启动分析(二)
main函数
run方法
1 | pringApplication#run |
这个是run里面的调用方法,很深哦^_^。
回顾下上面,其实在boot对象创建的时候,将contextInitializer和listener都实例化好了。放到了全局变量里。run的时候应该会用到。
- 如下是run的实体方法内容:
1
2
3
4
5
6
7
8
9
10
11
12
13
14
15
16
17
18
19
20
21
22
23
24
25
26
27
28
29
30
31
32
33
34
35
36
37
38
39
40
41
42
43
44
45
46
47
48
49
50
51
52
53
54
55
56
57
58
59
60
61
62
63
64
65
66
67
68/**
* Run the Spring application, creating and refreshing a new
* {@link ApplicationContext}.
* @param args the application arguments (usually passed from a Java main method)
* @return a running {@link ApplicationContext}
*/
public ConfigurableApplicationContext run(String... args) {
//计算时间用。stopwatch有很多方法,还是蛮好用的。
StopWatch stopWatch = new StopWatch();
stopWatch.start();
ConfigurableApplicationContext context = null;
Collection<SpringBootExceptionReporter> exceptionReporters = new ArrayList<>();
//用来设置java.awt.headless 属性是true 还是false, java.awt.headless是J2SE的一种模式用于在缺少显示屏、键盘或者鼠标时的系统配置,很多监控工具如jconsole 需要将该值设置为true.(网上找的,具体没使用过)
configureHeadlessProperty();
//【6】这个runListeners,应该也是取/META-INF/spring.factories中的这个类进行实例化。具体看下面的解析>
//这里就实例化了SpringApplicationRunListeners对象,这个对象有个属性就是listeners,放了所有的SpringApplicationRunListener实现类。取到的就是EventPublishingRunListener
SpringApplicationRunListeners listeners = getRunListeners(args);
//【7】RunListener启动,具体见下面解析,主要是实例化所有的listener,并订阅这个EventPublishingRunListener这个事件的listener启动好。
listeners.starting();
try {
//创建Arguments对象
ApplicationArguments applicationArguments = new DefaultApplicationArguments(
args);
//【8】准备运行环境,里面有些方法,见如下剖析
ConfigurableEnvironment environment = prepareEnvironment(listeners,
applicationArguments);
//spring.beaninfo.ignore”,值为“true”意味着跳过 搜索BeanInfo类(通常情况下,没有这样的课程 首先在应用程序中为bean定义)。 考虑到所有情况,默认值是“false”BeanInfo元数据类,如 标准Introspector.getBeanInfo(Class)调用。 如果哟,考虑切换这个标志为“真”体验重复的ClassLoader 访问不存在的BeanInfo类,如果这种访问是昂贵的 启动或在拉zy loading。
configureIgnoreBeanInfo(environment);
//从enviroment中取出环境信息进行打印。判断是console还是
Banner printedBanner = printBanner(environment);
//【9】这是核心方法,创建应用的上下文AnnotationConfigServletWebServerApplicationContext,继承自ServletWebServerApplicationContex,容器启动也是通过这个上下文进行的,具体见后面的详细说明。核心类ServletWebServerApplicationContext & ServletWebServerFactory
context = createApplicationContext();
//这里应该是处理异常的,不高兴看进去了,接着往下看重要的。^_^
exceptionReporters = getSpringFactoriesInstances(
SpringBootExceptionReporter.class,
new Class[] { ConfigurableApplicationContext.class }, context);
//【10】准备上下文:contextLoaded->ApplicationPreparedEvent
prepareContext(context, environment, listeners, applicationArguments,
printedBanner);
//【11】刷新上下文,创建容器,启动容器。
refreshContext(context);
//这个方法没做任何事。
afterRefresh(context, applicationArguments);
stopWatch.stop();
if (this.logStartupInfo) {
new StartupInfoLogger(this.mainApplicationClass)
.logStarted(getApplicationLog(), stopWatch);
}
//发布ApplicationStartedEvent事件。
listeners.started(context);
//没有定义runner,这里不执行,直接跳过。
callRunners(context, applicationArguments);
}
catch (Throwable ex) {
handleRunFailure(context, ex, exceptionReporters, listeners);
throw new IllegalStateException(ex);
}
try {
//发布ApplicationReadyEvent事件。
listeners.running(context);
}
catch (Throwable ex) {
handleRunFailure(context, ex, exceptionReporters, null);
throw new IllegalStateException(ex);
}
return context;
}
【6】getRunListeners:
1 | private SpringApplicationRunListeners getRunListeners(String[] args) { |
调用了getSpringFactoriesInstances这个方法,这个方法的核心是SpringFactoriesLoader。加载SpringApplicationRunListener的实现类。并将它封装到一个属性list中:listeners
EventPublishingRunListener。
1
2
3#Run Listeners
org.springframework.boot.SpringApplicationRunListener=\
org.springframework.boot.context.event.EventPublishingRunListener
这里对EventPublishingRunListener做下说明:
1、他是springboot中所有发布事件对触发器,前面的listeners都已经就绪,现在就等着发布事件了。
2、在各个环境开始发布事件,触发listener订阅的事件运行下去。
这里可以提下,用了发布订阅模式:publish/subscribe
【7】listeners.starting():这里是EventPublishingRunListener的starting方法。
- ConfigFileApplicationListener: ApplicationEvent
- DelegatingApplicationListener: ApplicationEvent
- ClasspathLoggingApplicationListener: ApplicationEvent
- LoggingApplicationListener: ApplicationEvent
- LiquibaseServiceLocatorApplicationListener: ApplicationStartingEvent
如上几个listener的onApplication的方法会执行,基于ApplicationStartingEvent事件。
1 |
|
SimpleApplicationEventMulticaster.java1
2
3
4
5
6
7
8
9
10
11
12
13
14
15
16
17
18
19
20
21
22
23
24
25
26
27
28
29
30
31
32
33
34
35
36
37
38
39
40
41
42
43
44
45
46
47
48
49
50
51
52
53
54
55
56
57
58
59
60
61
62
63
64
65
66
67
68
69
70
71
72
73
74
75
76
77
78
79
80
81
82
83
84
85
86
87
88
89
90
91
92
93
94
95
96
97
98
99
100
101
102
103
104
105
106
107
108
109
110
111
112
113
114
115
116
117
118
119
120
121
122
123
124
public void multicastEvent(ApplicationEvent event) {
multicastEvent(event, resolveDefaultEventType(event));
}
public void multicastEvent(final ApplicationEvent event, @Nullable ResolvableType eventType) {
ResolvableType type = (eventType != null ? eventType : resolveDefaultEventType(event));
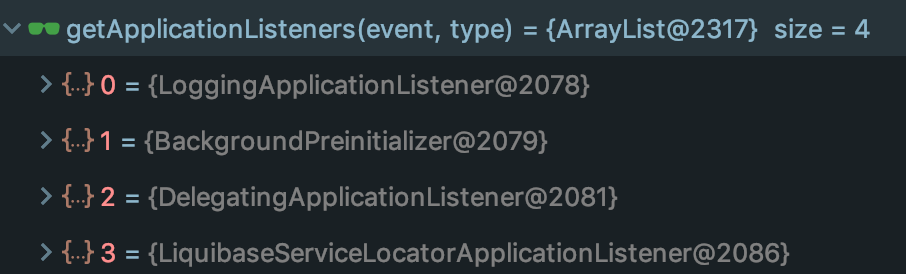
//这里的event就是ApplicationStartingEvent,我们看下getApplicationListeners在下面,其实通过截图能看到就4个配置了starting事件。
for (final ApplicationListener<?> listener : getApplicationListeners(event, type)) {
//初始化这个是空
Executor executor = getTaskExecutor();
if (executor != null) {
executor.execute(() -> invokeListener(listener, event));
}
//走到这里,就是开始订阅事件了执行llistener.onApplicationEvent(event);,熟悉spring的事件机制的都懂。
else {
invokeListener(listener, event);
}
}
}
/**
* Return a Collection of ApplicationListeners matching the given
* event type. Non-matching listeners get excluded early.
*/
//不言而喻,是获取对应的订阅了该事件的listener
protected Collection<ApplicationListener<?>> getApplicationListeners(
ApplicationEvent event, ResolvableType eventType) {
Object source = event.getSource();
Class<?> sourceType = (source != null ? source.getClass() : null);
//这里new了一个对象,就是事件类型对应的事件对象类型
ListenerCacheKey cacheKey = new ListenerCacheKey(eventType, sourceType);
// Quick check for existing entry on ConcurrentHashMap...
//优先从cache中去取。第一次肯定是取不到的。
ListenerRetriever retriever = this.retrieverCache.get(cacheKey);
if (retriever != null) {
return retriever.getApplicationListeners();
}
if (this.beanClassLoader == null ||
(ClassUtils.isCacheSafe(event.getClass(), this.beanClassLoader) &&
(sourceType == null || ClassUtils.isCacheSafe(sourceType, this.beanClassLoader)))) {
// Fully synchronized building and caching of a ListenerRetriever
synchronized (this.retrievalMutex) {
retriever = this.retrieverCache.get(cacheKey);
if (retriever != null) {
return retriever.getApplicationListeners();
}
retriever = new ListenerRetriever(true);
//方法其实会走到这里,这里是核心的,我们再看下retrieveApplicationListeners方法。
Collection<ApplicationListener<?>> listeners =
retrieveApplicationListeners(eventType, sourceType, retriever);
//取到了后,直接放到cache中。
this.retrieverCache.put(cacheKey, retriever);
return listeners;
}
}
else {
// No ListenerRetriever caching -> no synchronization necessary
return retrieveApplicationListeners(eventType, sourceType, null);
}
}
/**
* Actually retrieve the application listeners for the given event and source type.
*/
private Collection<ApplicationListener<?>> retrieveApplicationListeners(
ResolvableType eventType, Class<?> sourceType, ListenerRetriever retriever) {
List<ApplicationListener<?>> allListeners = new ArrayList<>();
Set<ApplicationListener<?>> listeners;
Set<String> listenerBeans;
//这里同步加锁,防止多次添加
synchronized (this.retrievalMutex) {
listeners = new LinkedHashSet<>(this.defaultRetriever.applicationListeners);
listenerBeans = new LinkedHashSet<>(this.defaultRetriever.applicationListenerBeans);
}
//【7-1】这里开始循环获取所有的listener,关键是supportEvent方法。每个listener中配置了个东西:这个就是决定是否支持这些事件的源头。下面就一帆风顺了
for (ApplicationListener<?> listener : listeners) {
if (supportsEvent(listener, eventType, sourceType)) {
if (retriever != null) {
retriever.applicationListeners.add(listener);
}
allListeners.add(listener);
}
}
//如下是实例化bean
if (!listenerBeans.isEmpty()) {
BeanFactory beanFactory = getBeanFactory();
for (String listenerBeanName : listenerBeans) {
try {
Class<?> listenerType = beanFactory.getType(listenerBeanName);
if (listenerType == null || supportsEvent(listenerType, eventType)) {
ApplicationListener<?> listener =
beanFactory.getBean(listenerBeanName, ApplicationListener.class);
if (!allListeners.contains(listener) && supportsEvent(listener, eventType, sourceType)) {
if (retriever != null) {
retriever.applicationListenerBeans.add(listenerBeanName);
}
allListeners.add(listener);
}
}
}
catch (NoSuchBeanDefinitionException ex) {
// Singleton listener instance (without backing bean definition) disappeared -
// probably in the middle of the destruction phase
}
}
}
//排序。
AnnotationAwareOrderComparator.sort(allListeners);
return allListeners;
}
protected boolean supportsEvent(
ApplicationListener<?> listener, ResolvableType eventType, @Nullable Class<?> sourceType) {
GenericApplicationListener smartListener = (listener instanceof GenericApplicationListener ?
(GenericApplicationListener) listener : new GenericApplicationListenerAdapter(listener));
return (smartListener.supportsEventType(eventType) && smartListener.supportsSourceType(sourceType));
}
【7-1】listener中的配置,决定每个listener支持哪些事件的源头:1
2
3private static final Class<?>[] EVENT_TYPES = { ApplicationStartingEvent.class,
ApplicationEnvironmentPreparedEvent.class, ApplicationPreparedEvent.class,
ContextClosedEvent.class, ApplicationFailedEvent.class };
Tips:isAssignableFrom
isAssignableFrom 是用来判断一个类Class1和另一个类Class2是否相同或是另一个类的超类或接口。而instanceof 是用来判断一个对象实例是否是一个类或接口的或其子类子接口的实例1
2
3
4
5
6
7
8
9
10private boolean isAssignableFrom(Class<?> type, Class<?>... supportedTypes) {
if (type != null) {
for (Class<?> supportedType : supportedTypes) {
if (supportedType.isAssignableFrom(type)) {
return true;
}
}
}
return false;
}
【8】prepareEnvironment方法相关:
- FileEncodingApplicationListener: ApplicationEnvironmentPreparedEvent
- AnsiOutputApplicationListener: ApplicationEnvironmentPreparedEvent
这两个listener会触发onApplicationEvent事件的执行
1 | private ConfigurableEnvironment prepareEnvironment( |

Tips:获取当前类的classloader:
ClassUtils.getDefaultClassLoader()
【9】createApplicationContext()方法:
1 | protected ConfigurableApplicationContext createApplicationContext() { |
【9-1】AnnotationConfigServletWebServerApplicationContext这个类是重点,实例化过程如下:
继承自:ServletWebServerApplicationContext,我们看下这个类的官方注释:1
2
3
4
5
6
7
8
9
10
11
12
13
14
15
16
17
18
19
20
21
22
23
24
25
26
27
28
29
30
31/**
* A {@link WebApplicationContext} that can be used to bootstrap itself from a contained
* {@link ServletWebServerFactory} bean.
* <p>
* This context will create, initialize and run an {@link WebServer} by searching for a
* single {@link ServletWebServerFactory} bean within the {@link ApplicationContext}
* itself. The {@link ServletWebServerFactory} is free to use standard Spring concepts
* (such as dependency injection, lifecycle callbacks and property placeholder variables).
* <p>
* In addition, any {@link Servlet} or {@link Filter} beans defined in the context will be
* automatically registered with the web server. In the case of a single Servlet bean, the
* '/' mapping will be used. If multiple Servlet beans are found then the lowercase bean
* name will be used as a mapping prefix. Any Servlet named 'dispatcherServlet' will
* always be mapped to '/'. Filter beans will be mapped to all URLs ('/*').
* <p>
* For more advanced configuration, the context can instead define beans that implement
* the {@link ServletContextInitializer} interface (most often
* {@link ServletRegistrationBean}s and/or {@link FilterRegistrationBean}s). To prevent
* double registration, the use of {@link ServletContextInitializer} beans will disable
* automatic Servlet and Filter bean registration.
* <p>
* Although this context can be used directly, most developers should consider using the
* {@link AnnotationConfigServletWebServerApplicationContext} or
* {@link XmlServletWebServerApplicationContext} variants.
*
* @author Phillip Webb
* @author Dave Syer
* @see AnnotationConfigServletWebServerApplicationContext
* @see XmlServletWebServerApplicationContext
* @see ServletWebServerFactory
*/
大致意思就是这个类会在应用的上下文内去搜索ServletWebServerFactory,并启动一个webServer。任何在上下文内定义的Servlet或者Filter,都会自动化注册到web server中。
这个类有如下方法,我们暂时标注下,后面还会涉及到:
- refresh
- onRefresh:
- createWebServer
- finishRefresh
- startWebServer
- publishEvent(new ServletWebServerInitializedEvent(webServer, this));
- onClose
- stopAndReleaseWebServer
- getWebServerFactory: 这个就是从context中获取具体到server的bean实例。
1
2
3
4
5
6
7
8
9
10
11
12
13
14
15
16
17
18
19
20
21
22
23/**
* Returns the {@link ServletWebServerFactory} that should be used to create the
* embedded {@link WebServer}. By default this method searches for a suitable bean in
* the context itself.
* @return a {@link ServletWebServerFactory} (never {@code null})
*/
protected ServletWebServerFactory getWebServerFactory() {
// Use bean names so that we don't consider the hierarchy
String[] beanNames = getBeanFactory()
.getBeanNamesForType(ServletWebServerFactory.class);
if (beanNames.length == 0) {
throw new ApplicationContextException(
"Unable to start ServletWebServerApplicationContext due to missing "
+ "ServletWebServerFactory bean.");
}
if (beanNames.length > 1) {
throw new ApplicationContextException(
"Unable to start ServletWebServerApplicationContext due to multiple "
+ "ServletWebServerFactory beans : "
+ StringUtils.arrayToCommaDelimitedString(beanNames));
}
return getBeanFactory().getBean(beanNames[0], ServletWebServerFactory.class);
}
我们看下ServletWebServerFactory的类关系: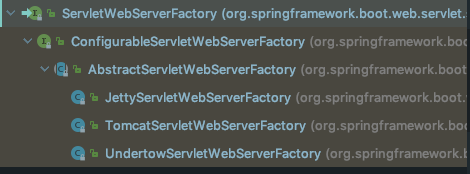 ,可以清晰的看到,springboot默认支持jetty、tomcat、undertow三种容器。
- 看下AnnotationConfigServletWebServerApplicationContext这个类的属性:
1
2
3
4
5
6
7
8
9
10
11
12
13
14
15
16//注解定义的类的Reader
private final AnnotatedBeanDefinitionReader reader;
//扫描器,添加了某种类型注解的所有的类,进行扫描,这个在读feignclient的源码的时候也有遇到过。
private final ClassPathBeanDefinitionScanner scanner;
//注解类
private final Set<Class<?>> annotatedClasses = new LinkedHashSet<>();
//包
private String[] basePackages;
//构造函数
public AnnotationConfigServletWebServerApplicationContext() {
//【9-1-1】
this.reader = new AnnotatedBeanDefinitionReader(this);
//【9-1-2】如下,看下注释,就是所有的controller,component,service等通用注解注册
this.scanner = new ClassPathBeanDefinitionScanner(this);
}
【9-1-1】AnnotatedBeanDefinitionReader.java
这个主要是将一些通用注解的处理器注册进容器里,比如Autowired,或者PostConstruct等。1
2
3
4
5
6
7
8
9public AnnotatedBeanDefinitionReader(BeanDefinitionRegistry registry, Environment environment) {
Assert.notNull(registry, "BeanDefinitionRegistry must not be null");
Assert.notNull(environment, "Environment must not be null");
this.registry = registry;
//这个里面获取了一些属性和对象,比如DefaultListableBeanFactory类。IOC的核心
this.conditionEvaluator = new ConditionEvaluator(registry, environment, null);
//【9-1-1-1】调用工具类进行注册这些注解的配置处理器。
AnnotationConfigUtils.registerAnnotationConfigProcessors(this.registry);
}
DefaultListableBeanFactory.java这个类可以单独开一篇文章来写了
【9-1-1-1】AnnotationConfigUtils.registerAnnotationConfigProcessors(this.registry):1
2
3
4
5
6
7
8
9
10
11
12
13
14
15
16
17
18
19
20
21
22
23
24
25
26
27
28
29
30
31
32
33
34
35
36
37
38
39
40
41
42
43
44
45
46
47
48
49
50
51
52
53
54
55
56
57
58
59
60
61
62
63
64
65
66
67
68
69
70
71
72
73
74
75
76
77
78
79/**
* Register all relevant annotation post processors in the given registry.
* @param registry the registry to operate on
* @param source the configuration source element (already extracted)
* that this registration was triggered from. May be {@code null}.
* @return a Set of BeanDefinitionHolders, containing all bean definitions
* that have actually been registered by this call
*/
public static Set<BeanDefinitionHolder> registerAnnotationConfigProcessors(
BeanDefinitionRegistry registry, @Nullable Object source) {
DefaultListableBeanFactory beanFactory = unwrapDefaultListableBeanFactory(registry);
if (beanFactory != null) {
//这里有个知识点,关于AnnotationAwareOrderComparator的类的,对于实现类Ordered接口或者注解@Order的,都能实现排序。
if (!(beanFactory.getDependencyComparator() instanceof AnnotationAwareOrderComparator)) {
beanFactory.setDependencyComparator(AnnotationAwareOrderComparator.INSTANCE);
}
if (!(beanFactory.getAutowireCandidateResolver() instanceof ContextAnnotationAutowireCandidateResolver)) {
beanFactory.setAutowireCandidateResolver(new ContextAnnotationAutowireCandidateResolver());
}
}
Set<BeanDefinitionHolder> beanDefs = new LinkedHashSet<>(8);
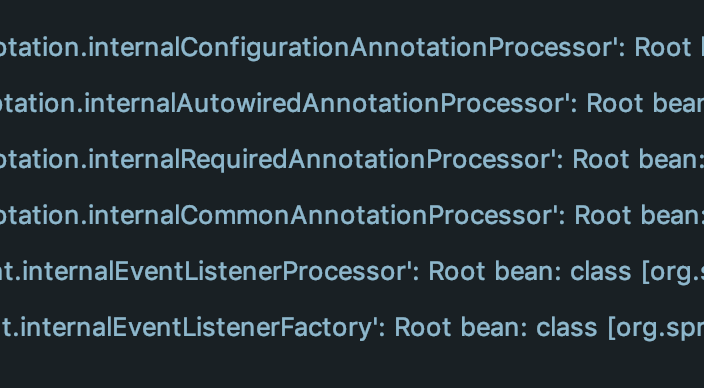
//这里到了spring framework框架内部了,实例化各种注解的处理器。注解的处理器值得研究下。对于后续自己写注解帮助还是蛮大的。把这些处理器注册到了容器中,见下图:
if (!registry.containsBeanDefinition(CONFIGURATION_ANNOTATION_PROCESSOR_BEAN_NAME)) {
RootBeanDefinition def = new RootBeanDefinition(ConfigurationClassPostProcessor.class);
def.setSource(source);
beanDefs.add(registerPostProcessor(registry, def, CONFIGURATION_ANNOTATION_PROCESSOR_BEAN_NAME));
}
if (!registry.containsBeanDefinition(AUTOWIRED_ANNOTATION_PROCESSOR_BEAN_NAME)) {
RootBeanDefinition def = new RootBeanDefinition(AutowiredAnnotationBeanPostProcessor.class);
def.setSource(source);
beanDefs.add(registerPostProcessor(registry, def, AUTOWIRED_ANNOTATION_PROCESSOR_BEAN_NAME));
}
if (!registry.containsBeanDefinition(REQUIRED_ANNOTATION_PROCESSOR_BEAN_NAME)) {
RootBeanDefinition def = new RootBeanDefinition(RequiredAnnotationBeanPostProcessor.class);
def.setSource(source);
beanDefs.add(registerPostProcessor(registry, def, REQUIRED_ANNOTATION_PROCESSOR_BEAN_NAME));
}
// Check for JSR-250 support, and if present add the CommonAnnotationBeanPostProcessor.
if (jsr250Present && !registry.containsBeanDefinition(COMMON_ANNOTATION_PROCESSOR_BEAN_NAME)) {
RootBeanDefinition def = new RootBeanDefinition(CommonAnnotationBeanPostProcessor.class);
def.setSource(source);
beanDefs.add(registerPostProcessor(registry, def, COMMON_ANNOTATION_PROCESSOR_BEAN_NAME));
}
// Check for JPA support, and if present add the PersistenceAnnotationBeanPostProcessor.
if (jpaPresent && !registry.containsBeanDefinition(PERSISTENCE_ANNOTATION_PROCESSOR_BEAN_NAME)) {
RootBeanDefinition def = new RootBeanDefinition();
try {
def.setBeanClass(ClassUtils.forName(PERSISTENCE_ANNOTATION_PROCESSOR_CLASS_NAME,
AnnotationConfigUtils.class.getClassLoader()));
}
catch (ClassNotFoundException ex) {
throw new IllegalStateException(
"Cannot load optional framework class: " + PERSISTENCE_ANNOTATION_PROCESSOR_CLASS_NAME, ex);
}
def.setSource(source);
beanDefs.add(registerPostProcessor(registry, def, PERSISTENCE_ANNOTATION_PROCESSOR_BEAN_NAME));
}
if (!registry.containsBeanDefinition(EVENT_LISTENER_PROCESSOR_BEAN_NAME)) {
RootBeanDefinition def = new RootBeanDefinition(EventListenerMethodProcessor.class);
def.setSource(source);
beanDefs.add(registerPostProcessor(registry, def, EVENT_LISTENER_PROCESSOR_BEAN_NAME));
}
if (!registry.containsBeanDefinition(EVENT_LISTENER_FACTORY_BEAN_NAME)) {
RootBeanDefinition def = new RootBeanDefinition(DefaultEventListenerFactory.class);
def.setSource(source);
beanDefs.add(registerPostProcessor(registry, def, EVENT_LISTENER_FACTORY_BEAN_NAME));
}
return beanDefs;
}
【9-1-2】ClassPathBeanDefinitionScanner.java1
2
3
4
5
6
7
8
9
10
11
12
13
14
15
16
17
18
19
20
21
22
23
24
25
26
27/**
* Create a new {@code ClassPathBeanDefinitionScanner} for the given bean factory and
* using the given {@link Environment} when evaluating bean definition profile metadata.
* @param registry the {@code BeanFactory} to load bean definitions into, in the form
* of a {@code BeanDefinitionRegistry}
* @param useDefaultFilters whether to include the default filters for the
* {@link org.springframework.stereotype.Component @Component},
* {@link org.springframework.stereotype.Repository @Repository},
* {@link org.springframework.stereotype.Service @Service}, and
* {@link org.springframework.stereotype.Controller @Controller} stereotype annotations
* @param environment the Spring {@link Environment} to use when evaluating bean
* definition profile metadata
* @param resourceLoader the {@link ResourceLoader} to use
* @since 4.3.6
*/
public ClassPathBeanDefinitionScanner(BeanDefinitionRegistry registry, boolean useDefaultFilters,
Environment environment, @Nullable ResourceLoader resourceLoader) {
Assert.notNull(registry, "BeanDefinitionRegistry must not be null");
this.registry = registry;
if (useDefaultFilters) {
registerDefaultFilters();
}
setEnvironment(environment);
setResourceLoader(resourceLoader);
}
【10】prepareContext()方法
1 | private void prepareContext(ConfigurableApplicationContext context, |
applyInitializers:
- 主要是如下6个Initializer,这个在META-INF/spring.factories中都能找到。
1
2
3
4
5
6
7rg.springframework.context.ApplicationContextInitializer=\
org.springframework.boot.context.ConfigurationWarningsApplicationContextInitializer,\
org.springframework.boot.context.ContextIdApplicationContextInitializer,\
org.springframework.boot.context.config.DelegatingApplicationContextInitializer,\
org.springframework.boot.web.context.ServerPortInfoApplicationContextInitializer,\
org.springframework.boot.autoconfigure.SharedMetadataReaderFactoryContextInitializer,\
org.springframework.boot.autoconfigure.logging.ConditionEvaluationReportLoggingListener
这里没什么核心的要看的东西,继续往下走,如有需要,可以看下各个的initialize方法。
listeners.contextLoaded(context)方法:
- 第一步是将所有的listener加入到context上下文中(这个上下文在上面是直接实例化出来的,会启动容器等)
- 发布ApplicationPreparedEvent事件。
1 |
|

【11】refreshContext(context):
这里就开始调用AnnotationConfigServletWebServerApplicationContext.refresh方法了1
2
3
4
5
6
7
8
9/**
* Refresh the underlying {@link ApplicationContext}.
* @param applicationContext the application context to refresh
*/
protected void refresh(ApplicationContext applicationContext) {
Assert.isInstanceOf(AbstractApplicationContext.class, applicationContext);
//这个方法会直接调用AnnotationConfigServletWebServerApplicationContext.refresh方法,这个会执行父类的方法ServletWebServerApplicationContext.refresh()方法
((AbstractApplicationContext) applicationContext).refresh();
}
ServletWebServerApplicationContext.java 继承自AbstractApplicationContext.java
这里调用spring-framework中的refresh()。1
2
3
4
5
6
7
8
9
10
public final void refresh() throws BeansException, IllegalStateException {
try {
super.refresh();
}
catch (RuntimeException ex) {
stopAndReleaseWebServer();
throw ex;
}
}
AbstractApplicationContext.java
onRefresh调用的是ServletWebServerApplicationContext中的方法,finishRefresh也是,这里启动容器。1
2
3
4
5
6
7
8
9
10
11
12
13
14
15
16
17
18
19
20
21
22
23
24
25
26
27
28
29
30
31
32
33
34
35
36
37
38
39
40
41
42
43
44
45
46
47
48
49
50
51
52
53
54
55
56
57
58
59
60
61
62
63
64
65
66
public void refresh() throws BeansException, IllegalStateException {
synchronized (this.startupShutdownMonitor) {
// Prepare this context for refreshing.
prepareRefresh();
// Tell the subclass to refresh the internal bean factory.
ConfigurableListableBeanFactory beanFactory = obtainFreshBeanFactory();
// Prepare the bean factory for use in this context.
prepareBeanFactory(beanFactory);
try {
// Allows post-processing of the bean factory in context subclasses.
postProcessBeanFactory(beanFactory);
// Invoke factory processors registered as beans in the context.
invokeBeanFactoryPostProcessors(beanFactory);
// Register bean processors that intercept bean creation.
registerBeanPostProcessors(beanFactory);
// Initialize message source for this context.
initMessageSource();
// Initialize event multicaster for this context.
initApplicationEventMulticaster();
// Initialize other special beans in specific context subclasses.
//创建webserver
onRefresh();
// Check for listener beans and register them.
registerListeners();
// Instantiate all remaining (non-lazy-init) singletons.
finishBeanFactoryInitialization(beanFactory);
// Last step: publish corresponding event.
//启动webserver
finishRefresh();
}
catch (BeansException ex) {
if (logger.isWarnEnabled()) {
logger.warn("Exception encountered during context initialization - " +
"cancelling refresh attempt: " + ex);
}
// Destroy already created singletons to avoid dangling resources.
destroyBeans();
// Reset 'active' flag.
cancelRefresh(ex);
// Propagate exception to caller.
throw ex;
}
finally {
// Reset common introspection caches in Spring's core, since we
// might not ever need metadata for singleton beans anymore...
resetCommonCaches();
}
}
}
我们看下怎么创建web服务器:ServletWebServerApplicationContext.java1
2
3
4
5
6
7
8
9
10
11
12
13
14
15
16
17
18
19
20
21
22
23
24
25
26
27
28
29
30
31
32
33
34
35
36
37
38
39
40
41
42
43
44private void createWebServer() {
WebServer webServer = this.webServer;
ServletContext servletContext = getServletContext();
if (webServer == null && servletContext == null) {
//这里是重点,获取serverFactory,看下面方法的应用->
ServletWebServerFactory factory = getWebServerFactory();
this.webServer = factory.getWebServer(getSelfInitializer());
}
else if (servletContext != null) {
try {
getSelfInitializer().onStartup(servletContext);
}
catch (ServletException ex) {
throw new ApplicationContextException("Cannot initialize servlet context",
ex);
}
}
initPropertySources();
}
/**
* Returns the {@link ServletWebServerFactory} that should be used to create the
* embedded {@link WebServer}. By default this method searches for a suitable bean in
* the context itself.
* @return a {@link ServletWebServerFactory} (never {@code null})
*/
protected ServletWebServerFactory getWebServerFactory() {
// Use bean names so that we don't consider the hierarchy
//这里从容器中去ServletWebServerFactory实现类。我们前面讲过有三个实现类。如何到上下文中,这个和springboot的自动装配有关系。后面来解释。
String[] beanNames = getBeanFactory()
.getBeanNamesForType(ServletWebServerFactory.class);
if (beanNames.length == 0) {
throw new ApplicationContextException(
"Unable to start ServletWebServerApplicationContext due to missing "
+ "ServletWebServerFactory bean.");
}
if (beanNames.length > 1) {
throw new ApplicationContextException(
"Unable to start ServletWebServerApplicationContext due to multiple "
+ "ServletWebServerFactory beans : "
+ StringUtils.arrayToCommaDelimitedString(beanNames));
}
return getBeanFactory().getBean(beanNames[0], ServletWebServerFactory.class);
}
下一期分析自动装配机制。
本文作者 : braveheart
原文链接 : https://zhangjun075.github.io/passages/springboot启动分析-(二)/
版权声明 : 本博客所有文章除特别声明外,均采用 CC BY-NC-SA 4.0 许可协议。转载请注明出处!
知识 & 情怀 | 二者兼得